Showing posts with label Children. Show all posts

Monday, May 7, 2012

Mother's Day Crafting Ideas! What fun! I'm a crafting junkie, not even therapy helps. I don't always finish what I start (shhhh) but I love it and am willing to try almost anything.  I've been thinking about the homemade gifts I've received throughout the years. Those are the ones that I remember the most.

As a woman, I can tell you that we appreciate and love anything that our children hand to us.  We're just thrilled to get something from our little guys. This is truly where "it's the thought that counts" holds true.

Here are some favorite Mother's Day Crafting ideas I came up with.


stringing beads

you can't go wrong with jewelry. This link will take you to a blog that I found online that has step by step instructions for stringing beads and other great ideas.

Even toddlers can make Mother's Day crafts with a little help.

Framed Photos

Every mother loves to look at pictures of her kids. So why not pick out a favorite picture or yourself with Mom and create a beautiful frame for it? There are many ways you can go about making photo frames. One of the cheapest and simplest ways to make a picture frame is to cut one out of paper.
  • Construction paper,
  • card stock
  • and thick scrap-booking paper are good choices.
  • Or, if you want to make the frame even sturdier, use corrugated cardboard.
Decorate with paint, glitter and stickers. Add a magnet to the back for easy display on the refrigerator.

You can also make frames out of craft sticks. Just glue the ends of four sticks together to make a square, and decorate with markers or paint. Or if you prefer, buy a plain photo frame and decorate it as you please.

Candle Holders
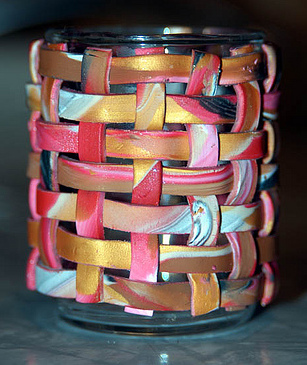

  • It's easy to make a lovely candle-holder out of a small jar.
  • Larger baby food jars work well for tea-lights and votives.
  • Pint jars can hold votives or small pillar candles.
To decorate, use tissue paper. Mix equal parts white glue and water, and stick the paper onto the outside of the jar, stopping below the rim. Use pieces of different colors to create a stained glass look. Cut some shapes out of the paper if you like, arrange them in a pretty pattern, and glue on top of the larger pieces. Coat with the glue mixture to seal, and let dry.

Bath Salts

woman in tub bath salts

Want to help Mom pamper herself on her special day? Make her some homemade bath salts. They will help her relax and leave her skin feeling great.

Here's How:

Mix
  • 3 cups of Epsom salts,
  • 2 cups of baking soda, and
  • 1 cup of table salt.
  • Add about twenty drops of a fragrant essential oil. Lavender, sandalwood and chamomile are good choices.
Mix thoroughly. Present the bath salts to Mom in a pretty jar tied with a ribbon.


Decorative Flowerpot Moms adore flowers

Creating a unique flowerpot with a plant you've grown for her is sure to bring a smile to her face. Small unglazed terracotta flowerpots are easy to paint on. Use acrylic paint to make a pretty scene or design. If you don't have a flowerpot, a styrofoam cup will do. You can decorate it with markers, glitter glue and stickers.

When your creation is dry, fill it with potting soil and plant a few seeds. Try to do this a week or two before Mother's Day so the plant will have time to start growing. If you don't have anything growing, go ahead and apply the seed package to a popsicle stick and stick it in the dirt.  Don't forget to give it plenty of sun and water.

Place-mats

Making place-mats out of contact paper is very easy. Have your toddler cut shapes out of construction paper and glue them onto a whole piece with a glue stick. He can add detail with markers or embellish with stickers. When he's done, place the artwork on a piece of contact paper, sticky side up. Place another sheet of contact paper on top, sticky side down.

Kids want to show their moms just how special they are. Store-bought gifts and cards are nice, but they lack that personal touch and it means more to kids to make it themselves.  Something made just for Mom has much more sentimental value

Mom is sure to appreciate these simple yet thoughtful crafts. They will give her fond Mother's Day memories for years to come!

photo credits: MOEL1, Francine Toukou, Chickeemama
I've been looking for Mother's Day crafting ideas and handprint crafts was high on my list. I made a sweatshirt for my grandma once that had all of her great grand-kids handprints on it...I had more running around time involved in making it than in actually making it. Even so, I'm not an expert when it comes to working with plaster paris so I found the next best thing.  I'm going to pick up my grandson tomorrow and we're going to try these out while he still has his tiny 3-year-old hands! I hope lots of mama's get some handprints for Mothers Day.

handprint crafts

Crafting - Easy Baby Handprint Crafts

Handprints of your baby make treasured gifts that last a lifetime. Handprint crafts are inexpensive and easy to create with the right instructions and you can choose painted handprints, plaster of paris handprints and more. Enjoy making an adorable piece of art that will always be cherished by parents, grandparents and of course the children.

Below you will find projects for baby handprints complete with instructions and tips. These crafts are easy and enjoyable to do and the cost is small for such a large return.

Painted Hands Craft:

Start by painting baby's hand generously with ceramic paint in the color of your choice. Once painted, press baby's hands down onto an unglazed plate. After you have achieved the desired handprint, wash baby's hands thoroughly.

Now take a pencil and draw a design around the border of the plate adding baby's birth date if desired. Use a fine paint brush and paint over the design you have drawn using ceramic paint. Write baby's name in the center of the plate with the pencil next to the handprint. Now the plate will need to be glazed and fired to finish it. Using a hot glue gun, glue a ribbon to the back of the plate to use for hanging the plate on a wall or you can display it using a plate stand.

Tip: If needed, use a local pottery shop to have your plate fired.

painting kids hand

Clay Impressions:

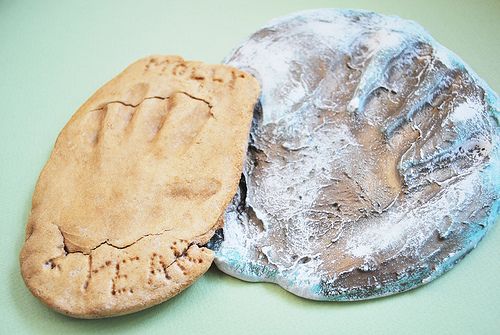
To get started, you will need some craft clay (the type that will harden after being worked with). Take the clay and shape it into a shape you desire the baby's handprints to placed on and be sure it is large enough to accommodate baby's hands. Make two holes at the top for putting wire or ribbon through for hanging. You may want to write out baby's name and birth date if desired near the top.

Now you are ready to take the baby's hands and press them firmly into the clay. If desired you can paint your clay creation or just leave it as is. Once dried you can place the ribbon or wire through the holes and hang your creation on the wall. You have easily made a beautiful and sentimental art piece for the entire family to enjoy.

Baby Box:

You will need a small box that is already stained. Mix together black and white child-safe paints to make the color gray. Place baby's palms into the gray paint and tenderly press them down on a piece of paper. Once the handprints have dried you will need to cut the prints out with a pair of scissors. Apply a thin coat of mod-podge to the back of the cut out prints and adhere them to the lid of the box. After the mod-podge has completely dried put another thin coat of mod-podge over the entire box.

Tip: With the use of colored paint and a thin paint brush you can add baby's name and date of birth before you mod-podge the entire box.

Plaster of Paris:

The items you will need for this craft are as follows: plaster of paris, 1 and 1/4 cup of water, small container for mixing, mixing spoon and a paper plate. In your small container place 2 cups of plaster of paris and slowly pour 1/4 cup of water at a time onto the plaster of paris while stirring; this will keep mixture smooth and without lumps. This mixing process should take no longer that 1 minute.

Once you have finished mixing you have 20 minutes to form your cast on the paper plate before it hardens. After washing and drying baby's hands, press baby's palms down firmly in to the formed plaster of paris for 3 minutes. Be sure to wash baby's hands promptly after you remove them from the mixture. Let the plaster sit for 12 to 24 hours in order to dry completely. With the use of a plate easel, baby's handprints can be easily displayed for all to see.

Tip:

  • Have enough plaster of paris on hand in case the first handprints don't come out very good so you can try again.

Find more free patterns for baby handprint crafts and baby footprint crafts along with many more craft ideas.
Article Source: http://EzineArticles.com/5174395

photos by: wildolive, Claudia_GM and margaretglin

Saturday, April 7, 2012

Free Child Safety Kit « Sharing it Forward


Free Child Safety Kit « Sharing it Forward

Kids Safety Tips
1. Approach the subject of safety in a non-threatening way, so that your
child is not fearful of dangerous people or situations, but cautious
and aware.
2. Open communication is the key. Encourage your child to trust their
intuition and to be able to tell you when something is wrong.
3. Make sure your child knows his or her full name, address and phone
number, and where you work or can be contacted. Teach them how to dial
911, make collect calls and how to use a pay phone operator.
4. Inform your child of the rules pertaining to strangers. Let your child
know that adults do not ask children for help nor can they threaten
them. They should never approach an unknown car or go anywhere with an
adult they do not know.
5. Never label clothing, backpacks or personal items with your child’s name. A stranger can use this information.
6. Put a system in place on what to do if you and your child are separated in a public place.
7. Know where your child is at all times
Enhanced by Zemanta

Thursday, April 5, 2012

Johnson's Baby

Marcelle Roulin as Baby
Marcelle Roulin as Baby (Photo credit: Wikipedia)
Save $1.50 on any Johnson's baby oil product.

Johnson's Baby
Enhanced by Zemanta